Vehicle Wheelstop Installation Guide
If you want to prevent cars, coaches, and HGVs from overshooting parking bays or hitting valuable infrastructure, wheel stops are an essential piece of kit.
In this article, we'll explain how to choose the right wheel stops for your needs, and how to install them properly.
Why are wheel stops required?
Wheel stops are primarily used to assist drivers in parking their vehicles. They offer a positive indication to the driver that they have driven fully into a parking bay, preventing them from overshooting the bay.
Parking stops have become increasingly prevalent in recent years, as vehicles have grown larger and have greater overhang from the wheel to the extremities of the vehicle. This often makes it difficult to judge exactly how the car is positioned in a bay.
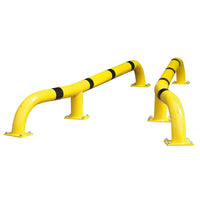
Another factor that has increased the prevalence and usage of parking stops is the rise of electric vehicle charging. When used in this setting, the parking stop can be part of a system of products that reduce the likelihood of vehicles hitting charging infrastructure.
In this instance, you would see the stop installed alongside heavy-duty bollards in front of the charger.

What vehicles can use wheel stops?
The most common vehicle to use wheel stops is a car, largely due to the high number of them on the road and the various scenarios in which wheel stops can be used. As mentioned above, they can be used purely as a parking aid or to protect the charging infrastructure.
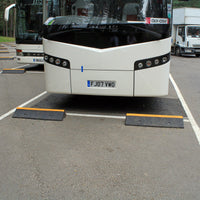
For larger vehicles, such as coaches, heavy goods vehicles, and light goods vehicles, parking stops remain a crucial tool and an integral part of a comprehensive safety and organisation systems for parking and loading areas.
They help to ensure that vehicles are parked uniformly, or aligned with raised kerbs, when onboarding pedestrians onto coaches at service stations and bus depots.
Where are wheel stops used?
As we mentioned earlier, the most common place to find car-focused wheel stops is at a charging station. You might see these in supermarket carparks, petrol stations, or even at home.
Many are installed outside office blocks simply to prevent cars from hitting the building or overshooting into pedestrian areas when parked.
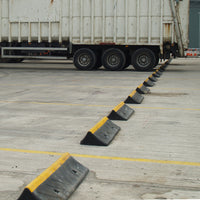
Truck wheel stops are almost exclusively used at HGV parking areas and distribution hubs, where they ensure that each vehicle is backed fully into a bay without risking the vehicle overshooting the bay and hitting nearby infrastructure, fencing, or buildings.
Coach stops are often installed where buses and coaches are stored, such as workshops and depots.
Choosing the right wheelstop
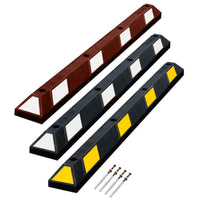
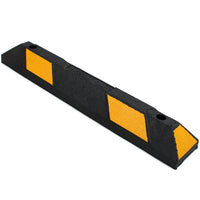
Within our range of wheel stops, we offer a variety of options including different brands, colours, and lengths. Some of these factors are more important than others; for example, length can be considered more important than colour.
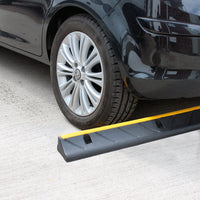
Wheel stop options for cars and small vans

Park-It
- Sizes: 550mm, 900mm and 1800mm size
- Colours: Yellow / Black, White / Black
- Key selling points: Choice of fixing types from a long-established brand with lots of history.

Park-Aid
- Sizes: 550mm, 900mm, 1200mm and 1800mm
- Colour: Yellow / Black, White / Black, Brick Red / White
- Key selling points: Comes with fixings included.

Ridgeback
- Sizes: 900mm only
- Colour: Yellow / Black only
- Key selling points: Very cost-effective, unique design.

CarStop
- Sizes: 1000mm only
- Colour: Yellow / Black only
- Key selling points: Very heavy-duty for a car stop.
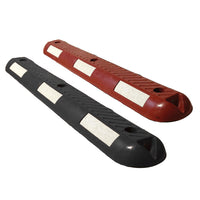
Wheel stops for coaches, light goods vehicles, and buses

CoachStop
- Sizes: 1000mm only
- Colours: Yellow / Black only
- Key features: Made from a heavy-duty blend of recycled tyres and resin.
Heavy goods vehicles (HGVs / articulated trailers)

TruckStop
- Size: 1000mm long
- Colour: Yellow / Black only
- Key features: Made from a heavy-duty blend of recycled tyres and resin. Includes heavy-duty fixings.

Heavy-Duty Wheel Stop
- Size: 1000mm long
- Colour: Yellow / Black only
- Key features: Heavy-duty construction from a quality brand.
Tools and equipment required for parking stop installation
Required tools:
- Tape measure
- Suitable SDS drill bit
- SDS drill
- Socket set & ratchet OR suitable impact driver with nut driver
- Hole dust pump
- Optional: Chalk line
Required PPE:
- Suitable gloves
- Eye protection
- Hearing protection
- Dust mask (FFP3)
- Trousers with knee pads OR kneeling pad
Positioning the wheel stops
The first step when installing wheel stops of any sort is to ensure that they are correctly positioned. The position of the wheel stop will depend on the type of wheel stop and the size of vehicles using the area.
Pro tip: If you are installing multiple stops, ensure they are perfectly aligned by using a long chalk line. This will result in a far neater installation.
Positioning car & van wheel stops
Car wheel stops should be positioned at an adequate distance from any obstacles so that the front or rear overhang of the vehicle does not project into pedestrian walkways or make contact with buildings, charging infrastructure, or other obstacles such as light fittings.

With the above in mind, we recommend that you position the wheel stops approximately 75cm from any obstacles. This should give enough clearance for the average vehicle overhang.
Of course, if you are installing this stop in an area where a specific vehicle is present, or at home, you can tailor it to your own requirements.

Within the bay, the stop should be aligned to the width of the most common vehicle. With longer 1800mm stops, this means aligning them in the centre of the bay.
For smaller stops, such as the 550mm, 900 mm, and 1000mm stops, they should ideally be placed so they cover the average UK vehicle track width, which is 1800mm.
Step by step setting out car and van parking stops:
- Measure 75cm from the front of the parking bay
- Mark a parallel line to the back of the parking bay across all bays where stops are being installed using a chalk line
- Measure to the centre of each bay, and position your chosen wheel stops accordingly, keeping the 1800mm track width of the average vehicle in mind.
Positioning coach & truck stops
The positioning of these can be more nuanced due to the specifics of the vehicles using the area. For many installations, the same type of vehicle will be using the bays day in and day out.
To determine the ultimate placement of the stops, you should measure the overhang at the rear (or front if vehicles are pulling in forwards) of the vehicle from where the back tyre contacts the floor.
You need to ensure this distance is exceeded to avoid collisions or overshooting. For example, if the overhang at the rear of a HGV trailer from the back wheels is 900mm, we recommend placing the wheel stop at least 1000mm from the nearest obstacle.

Side-to-side positioning of coach and truck stops should be to cover the track width of the vehicles using the area, with these styles of vehicle having a track width of 2300mm-2500mm on average.

Pro tip: Avoid placement directly adjacent to the bay markings for all types of wheel stops, this prevents pedestrians from tripping over them when walking between vehicles.
Step by step setting out truck & coach parking stops:
- Measure the average overhang at the rear of your vehicles
- Mark this position from the back of the bay
- Mark a parallel line to the back of the parking bay across all bays where stops are being installed using a chalk line
- Measure the width of your parking bays and mark the centre point of each
- Set your parking stops along the chalk line, keeping them spaced so that the stops cover the track width of the vehicle (HGV average of 2300-2500mm).
Fixing wheel stops
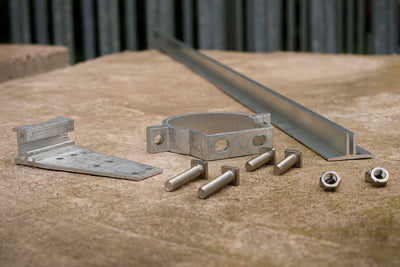
Many of our wheel stop options come with varying fixings; however, the installation method is often the same, with the key difference often being the depth and diameter of the drill bit used.
There are a couple of exceptions to this, which we will cover in further detail below.
1. Position your chosen wheel stop where you ultimately want it to be sited. You can then use this as a template to drill your holes.
2. Using a long 10mm SDS drill bit, drill down through the fixing locations and into the tarmac or concrete below.
3. Use the correct size SDS drill bit for the fixing to drill the final fixing hole using the 10mm hole as a pilot - (skip this step if using a rebar spike fixing).
- Park-It frame fixing drill size: 16mm
- Park-Aid fixing drill size: 16mm
- TruckStop fixing drill size: 16mm
- CoachStop fixing drill size: 14mm
- CarStop fixing drill size: 14mm
- Ridgeback Universal Fixing: drill size: 16mm
4. Use a hole blower to remove any dust and debris from the hole.

5. Insert the fixing plugs (for Park-Aid, Ridgeback or CarStop wheel stops only).
6. Place the wheel stop back in position, re-aligning the holes.
7. Insert fixings:
- For Park-Its, using our frame-fixing, the nylon plug should be pushed in through the top of the parking stop with the shoulder of the fixing sitting on the ledge at the top of the wheel stop. Once this is in position, the bolt can be screwed in.
- For CoachStop and TruckStop stops, there is no plug with the supplied screw that directly secures into the tarmac or concrete below.
- For all other stops, insert the bolt (with washer if included) into the stop and into the plug below, and tighten into position using a socket or impact driver until tight.
- If using rebar spikes, these can be hammered in from the top, pinning the wheel stop in position.
8. Check that the ramp is secure and cannot be moved.
Watch our ultimate guide to wheelstop installations for a demonstration on installing wheelstops.

What if you can't drill into the floor?
There are some places where it's not possible to drill into the floor to fix your wheel stops. For example:
- The upper floors of multi-storey car parks, where any drilling activity could compromise reinforcement bars and damage the structural integrity of the building
- Where utility services are running close to the surface, such as water, gas, and electricity
- Block paving, which is not practical to drill into as fixings can go between bricks or cause them to crack.
So what do you do in these scenarios? Fortunately, the solution is relatively simple; you can use an adhesive specially designed for wheel stops.
Glueing wheel stops in place
1. Once you have measured up and have your wheel stop in its final position, draw around the entire outline using a chalk marker or road crayon.
2. Following your markings, mask around the outline using duct tape to ensure the adhesive stays where intended.
3. Clean the underside of your wheel stop to remove any contaminants such as release agents, dirt, dust and oil. Hot soapy water is absolutely fine for this, as long as you dry it afterwards. Otherwise isopropyl alcohol can also be used.
4. Mix the wheel stop adhesive according to the instructions on the tin, being sure to work quickly as the adhesive only has a 15 minute working time.
5. Pour the adhesive into the outlined area we just created, to a depth of around 3mm, use a spreader or trowel to ensure adequate coverage.
6. Press your wheel stop into the adhesive.
7. Carefully remove the duct tape before the adhesive fully cures.
8. After 30 minutes (at 20 °C, in colder conditions the curing time may be extended) the wheel stop will be firmly secured in place.
Further notes and frequently asked questions
Fixings are only as good as the sub-surface
Should you fix into thin tarmac, then the fixing will only be as strong as the tarmac skin. In these situations, a rebar spike (or a concrete foundation) for the tops may be required.
When should rebar spikes be used?
We recommend using rebar spikes to secure Park-Its when installing into tarmac, although our frame fixing is also very capable even in tarmac.
Can I fix parking stops onto block paving?
Yes, but there is a catch. You can fix wheel stops into block paving, but we don't normally recommend this. This is because, as mentioned above, the limitation of any fixing is the surface to which it is being secured. If you bolt just to the blocks, there is nothing stopping the blocks from lifting and pulling up should the parking stop take a significant impact.
Need help finding the right wheel stop system?
If you need any assistance finding the best wheel stop solution for your workplace or project, then please do not hesitate to contact our friendly sales team. We have years of experience supplying all types of wheel stops across the UK. You can reach our team by calling 01905 794 875 or by using our contact page.
- Author


You might like:

JSP Ridgeback Wheel Stopper - 900mm - Fixings Included | HAD003-045-400
Park-it 1800mm Rubber Wheel Block / Stop With Fixings
TruckStop HGV Wheel Stops Stopper 1000mm Rubber Inc. Fixings
Park-aid 1800mm Rubber Wheel Stop With Fixings

Heavy-Duty Wheel Stop HGV & Truck | 1000mm | Fixings Included
CarStop Car Wheel Stopper 1000mm Rubber Inc. Fixings
CoachStop Coach Wheel Stops Stopper 1000mm Rubber Inc. Fixings

Park-it 550mm Rubber Wheel Block Home Parking Stop Inc Fixings
Park-it 900mm Rubber Wheel Block / Stop With Fixings
Procity Cycle Lane Separator - Recycled Rubber
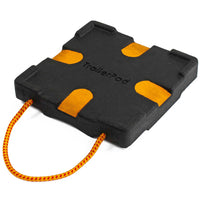
TrailerPad - HGV Trailer Leg Pad - Rope Included